Bitcoin and Hashicorp Vault

Securing your sensitive data using Hashicorp Vault
Introduction
In my previous article Bitcoin and Cold Storage using VeraCrypt , I covered one method of implementing Cold Storage with BlockStream Green wallet.
I would say it is paramount that you have a way to keep sensitive information secure and ideally that solution will allow programmatic access to that sensitive data as well.
Currently, I've been using KeePassXC and a feature within Keybase call kv store. I use KeePassXC in combination with mounting a cold storage device for its database which is exactly the same method used for using a cold storage with the Green wallet. KeePassXC programmatic access is too complicated to use for me.
I been using Keybase for the last 6 years or so and this is prior to Zoom purchasing Keybase. As good as Keybase is, it is a centralized tool under the control of Zoom . Should Zoom decide to freeze my account or stop supporting Keybase, I would be dead in the water. For the kv store feature in Keybase, I've put a lot of work into automating its functionality with PowerShell. This includes developing a PowerShell module called PSKeybase and a web interface for doing CRUD operation on the kv store. Anyway, I now see the writing on the wall that I need to find a replacement for Keybase.
In a corporate environment, I used Hashicorp Vault before and have always considered its use in a home computing environment to be too complicated to use. On my search for a Keybase replacement, I reviewed Hashicorp Vault again and to my surprise it had implemented a full RESTAPI to it. Now with over a month plus in development time, I've created a PowerShell script called, VaultApi which is fully integrated with Hashicorp Vault . Now, I've found my replacement for the Keybase kv store feature.
So you are likely wondering at this point, what in the hell has this to do with Bitcoin? The answer is with anything Bitcoin and related you need a secure way to store sensitive information. I've developed another PowerShell script called, BTCwallet which integrates with VeraCrypt , Hashicorp Vault , VaultApi for starting either Green or Sparrow wallet application using cold storage.
Also you are likely wondering why do I need a script to launch, Green wallet with cold storage. The answer is with the simple command of BTCwallet Start the following happens.
Prompt to select Green or Sparrow wallet
BTCwallet MD5 hash is validated. (VaultApi)
Hashicorp Vault Server is started if stopped. (VaultApi)
Vault is unsealed if sealed. Requires the entry of 3 different keys. (VaultApi)
Login to the Vault Server (VaultApi)
Use VeraCrypt to mount cold storage device. Password extracted from the Vault. (VeraCrypt CLI)
Launch BTC wallet application referencing the mount point from VeraCrypt
So, the BTCWallet Powershell scripts handles all these steps with entry of the command, BTCwallet Start .

The remainder of this article is going document how to install and setup Hashicorp Vault server and document the usage of the two PowerShell scripts, VaultApi and BTCwallet . Once these software components are installed and configured executing the command BTCwallet Start will launch either the Green or Sparrow wallet referencing either a hot or cold storage location.
In my previous article, I provided references on how to install and setup VeraCrypt and PowerShell on your Linux computer.
At this point you should have a Linux VM created with the following software installed and functional.
Blockstream's Green wallet
VeraCrypt
PowerShell
HashiCorp Vault
Hashicorp Vault will be installed and configured next. It too can be installed on the same Linux VM as your bitcoin wallet or it be could be installed on a totally different Linux VM instance. It all depends on how one plans on using the Vault. If you only plan on using the Vault with only your bitcoin wallet VM instance, then install it on the same VM, otherwise install it on a different VM instance.
Follow these steps to install and configure HashiCorp Vault
On the next step the config.hcl file should be saved in your home directory and be sure to click on the DOWNLOAD KEYS button In step 3 below set the ip address to your NON-ROUTED ip address of your VM instance api_addr =
http://192.168.10.109:8200
cluster_addr =https://192.168.10.109:8201
If you followed step 3, the Vault server should now be running and the vault is Unsealed. The Web interface should be available too from your web browser enter:
The only login option at this point is to use the root-token value which is in the downloaded json file.
When you clicked the Download Keys button, the file was downloaded to your Downloads directory. This file needs to be moved to your .ssh directory and renamed to VaultApi.json
Important be sure your .ssh directory permissions are set to only allow access from your Linux account.
The remaining configuration steps now are:
Create an ACL Policy named, admin
Enable Authentication method of UserName & Password
Create credentials for logging in with a username and password and associated with the admin policy.
Create kv Secrets Engine
The above four steps can only be done when logged in as the root-token .
Before embarking upon these configuration steps, its important to understand how the kv Secret Engine works. The navigation of the kv Secret Engine is based on a path structure almost identical to navigating the file system. When a kv Secret Engine is created a root path name is specified, like 'kv1', or 'mykv' or 'nameit'.
When one creates a key/value instance a path value needs to be specified, for example:
kv1/dogapp/login -key rover -value comeover
Now the path end point login has this key/value combination where dogapp end point may not any associated key/value.
I love it, it's the KISS principle big time .
Now, you need to decide on root path name for your kv Secret Engine to be created because it is needed in the remaining configuration steps. I recommend you use kv1 as your root path name because this is the value that VaultApi uses when the kvpath parameter is not specified.
Create an ACL Policy named, admin
Review the following on how to create an ACL Policy
Now create a ACL Policy named, admin with the following definition.
  # Read system health check
  path "sys/health"
  {
    capabilities = ["read", "sudo"]
  }

  # Create and manage ACL policies broadly across Vault

  # List existing policies
  path "sys/policies/acl"
  {
    capabilities = ["list"]
  }

  # Create and manage ACL policies
And replace path kv1/*
with your path root name if it is different.
Enable Authentication method of UserName & Password
Follow the below method, but the user account needs to reference the admin ACL Policy
Now logout of the Web Interface and log back in using the credentials you just created.
Create kv Secrets Engine
You should now be logged into the Vault Web Interface with the user credentials you created in step 2.
In left navigation pane, click on Secret Engines select Generic KV and click on the Next button.
In the Path field enter the name you selected for your root path. e.g. kv1
This root path should be in your ACL Policy, admin e.g. path kv1/*
Now expand the Method Options
In the Version field select '1'.
Now click on the Enable Engine button
In the left pane, click on Dashboard you know see the kv secret engine you just created.
Use the Web interface to get comfortable with creating key/value entries.
Hashicorp Vault server also has a CLI, execute Vault -h to see the command structure. Each of the CLI commands behind the scenes is making a RESTAPI call to Vault Server to complete the command.
VaultApi
The PowerShell script, VaultApi automates and simplifies the process of starting and stopping the Vault Server as well as simplifies the process of maintaining key/value entries in the kv Secret Engine.
VaultApi also adds some functionality not available in either Web Interface or in the native CLI command.
You must use Version 1 of Hashicorp Vault's kv Secret Engine.
For Linux, gpaste must be installed to get the clipboard functionality to work.
  sudo apt install xclip xsel
  sudo apt install gpaste

  Start a new terminal session
The Vault server should only be running when you want to create or retreive key/value entries.
Here is a full of example starting/stopping the Vault server and creating key/value pair entries.
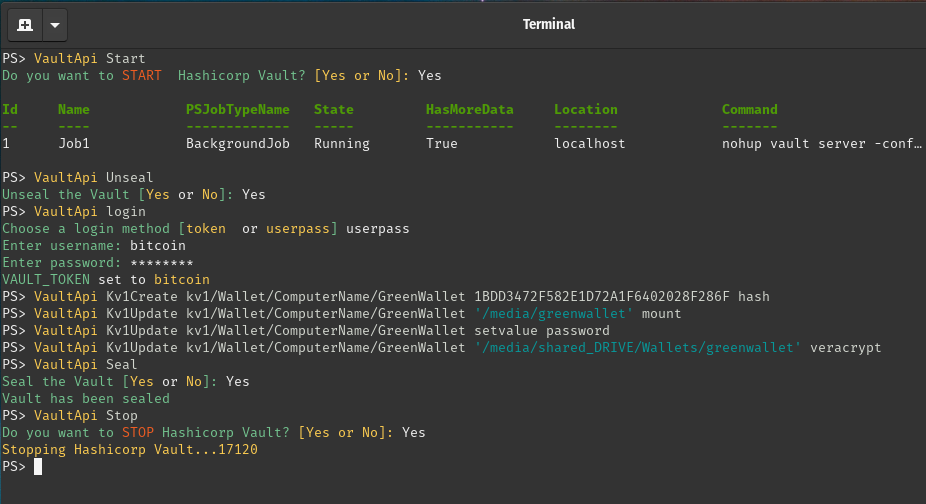
Not shown in the output is entering the command pwsh to start the PowerShell console denoted by the **PS> ** prompt.
  VaultApi Start        starts the Vault server in the background.
  VaultApi Unseal    unseals the Vault. The VaultApi.json file in your **.ssh** directory was used.
  VaultApi login       logged in with the established Vault server credentials
VaultApi Kv1Create kv1/Wallet/ComputerName/GreenWallet 1BDD3472F582E1D72A1F6402028F286F hash
Created a new path with the key named 'hash' with a value of '1BDD3472F582E1D72A1F6402028F286F'
VaultApi Kv1Update kv1/Wallet/ComputerName/GreenWallet '/media/greenwallet' mount
Updated the path with a new key named 'mount' with a value of '/media/greenwallet'
VaultApi Kv1Update kv1/Wallet/ComputerName/GreenWallet setvalue password
Updated the path with new key named 'password' with a value of a random 20 character password
VaultApi Kv1Update kv1/Wallet/ComputerName/GreenWallet '/media/shared_DRIVE/Wallets/greenwallet' veracryptVaultApi Seal Seals the Vault. Do this before shutting down the Vault Server
VaultApi Stop Stops the Vault Server and command history file is deleted.For the Vault Kv1Create and Kv1Update commands, parameter names can be used if that helps clarify the syntax.
VaultApi Kv1Update -kvpath kv1/Wallet/ComputerName/GreenWallet -kvalue setvalue -kvkey passwordNow, from the Vault Web Interface, this is how entries just created appear.
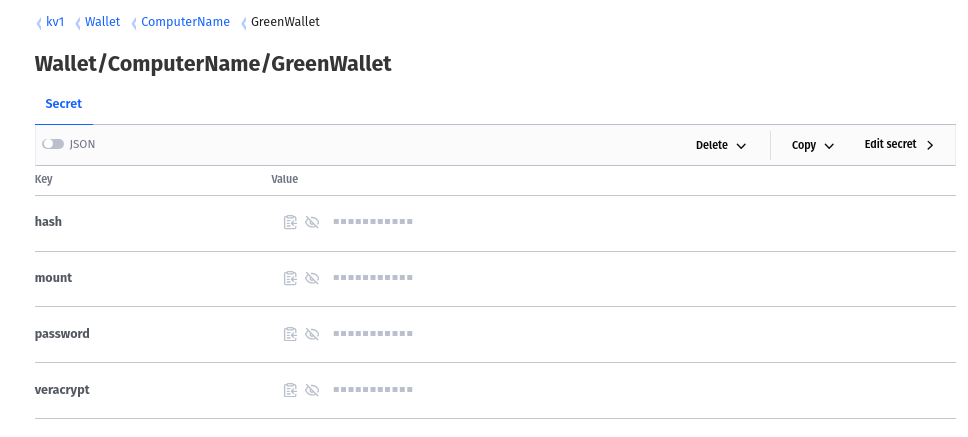
For accessing a Bitcoin wallet's cold storage, these key names need to be present in the kvpath with the correct values.
veracrypt - the path location of the VeraCrypt file to be mounted. value = /media/shared_DRIVE/Wallets/greenwallet
password - the password to the VeraCrypt file value = 'thepassword'
mount - the path of where to mount the VeraCrypt file value = /media/greenwallet
hash - the MD5 Hash value of the BTCwallet.ps1 script
The hash value is automatically maintained by the BTCwallet script to alert you if the script has been changed in any manner.
BTCwallet
The PowerShell script, BTCwallet integrates with the VaultApi script and VeraCrypt to automate the starting and stopping of either the Green or Sparrow bitcoin wallet.
Here is a screen shot starting/stopping the GreenWallet bitcoin wallet with cold storage.
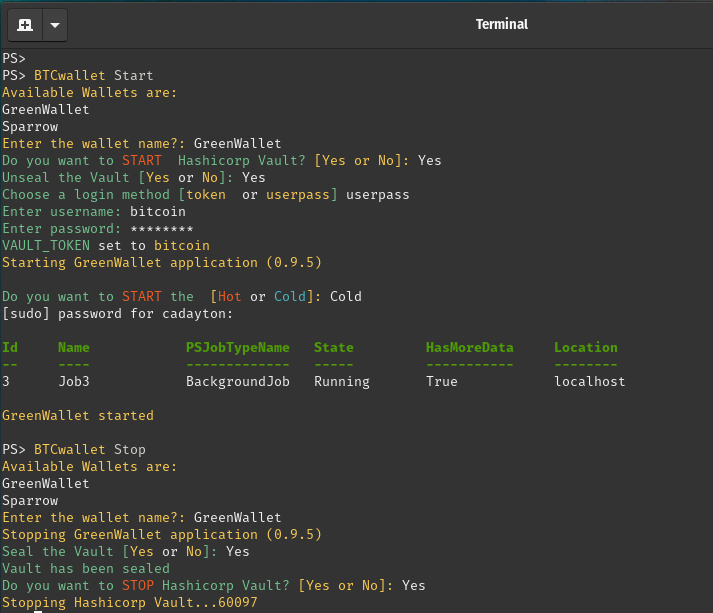
In this example, I've renamed the AppImage downloaded from Blockstream to GreenWallet
BTCwallet Start performs the follow task associate with launching the wallet
Asks which wallet app to launch.
Starts the Hashicorp Vault server. Only necessary if mounting the cold storage file.
Unseals the Hashicorp Vault server.
Logs into the Hashicorp Vault server with established credentials
Prompts to use either the Hot or Cold storage with the wallet.
Since Cold was selected. Integrates with VeraCrypt to mount the cold storage
Prompts to enter the Linux admin password to complete the mounting task.
The wallet application is launched in the background.
When done using the wallet application, the application interface is then closed.
BTCwallet Stop
Prompts which wallet application to stop.
Seals the Hashicorp Vault
Stops the Hashicorp Vault server.
Dismounts the cold storage using VeraCrypt
Cleans up the background task data.
Summary
Now with your dedicated Linux VM running using either or both of the Green or Sparrow bitcoin wallet you have a simplified solution of launching those applications with the wallet data being present on cold storage or you have the option of using the hot storage wallet data too.
Additionally, you now have two new tools VeraCrypt and Hashicorp Vault that can be used for securing your sensitive data whether or not it is associated with a bitcoin wallet.
To see the full documentation BTCwallet or VaultApi click on the either of the links below.
Both scripts can be purchased on Barnyard Market for $21 in Bitcoin or for $42 in fiat.